
I’ll be honest, I put off buying this thing for almost a year.
My mailbox sits at the end of a long driveway, and checking it had become one of those small daily frustrations I just lived with. Some days I’d make the trip twice because I wasn’t sure the mail had come yet. Other days I’d forget entirely and find a soggy pile of envelopes after a rainstorm. A neighbor mentioned the Ring Mailbox Sensor one afternoon and I nodded along, then went home and Googled it for 20 minutes and still couldn’t decide if it was worth the hassle.
So I bought it, set it up myself, and used it for several weeks before writing this. Here’s everything I learned, including the parts that surprised me and the one thing that genuinely annoyed me during setup.
If you’re already building out a home security setup, pairing this sensor with the best outdoor security cameras gives you alerts plus a visual record every time someone approaches your mailbox.
Ring Mailbox Sensor Quick Specification
| Feature | Details |
| Price (sensor only) | $29.99 |
| Price (bundle with bridge) | $49.99 |
| Dimensions | 2.56 x 2.44 x 1.47 inches |
| Power | 3x AAA batteries (not included) |
| Battery Life | Up to 3 years (new model) |
| Motion Detection Range | Up to 15 feet |
| Field of View | 120 degrees |
| Connection | Amazon Sidewalk, Ring Bridge, or Ring Alarm Pro |
| Weather Resistant | Yes |
| Alexa Compatible | Yes |
| Google Assistant / HomeKit | No |
| Subscription Required | No (for basic alerts) |
| Colors | Black, White |
What Comes in the Box
When I opened the package, I found more pieces than I expected for a $29 device. Inside the box you get the motion sensor itself, the external antenna, mounting hardware, double-sided adhesive tape, a rubber grommet, wire management clips, a drill bit, and a user manual. Ring also throws in a security sticker, which I didn’t use.
The drill bit was the first thing that made me pause. I hadn’t realized this installation would involve drilling into my mailbox. More on that in a minute.
The sensor is available in black or white. I went with white to match my mailbox. It’s made of plastic and feels reasonably solid, not cheap. But it is noticeably bulkier than I expected, it measures about 2.56 inches tall and 2.44 inches wide. That size works fine in a standard mailbox, but if you have a smaller or compact mail slot style box, measure the interior before you order.
How the Ring Mailbox Sensor Works
The sensor mounts inside your mailbox using the adhesive tape. When the door opens, it detects the motion through a PIR (passive infrared) sensor, the same technology used in most home security motion detectors. That signal travels through an external antenna to connect with either Amazon Sidewalk or a Ring Bridge, which then pushes a notification to your phone through the Ring app.
The piece most reviews don’t explain clearly: you have two ways to connect this thing, and which one applies to you changes whether you need to spend extra money.
| Connection Option | What You Need | Extra Cost |
| Amazon Sidewalk | Any nearby Echo or Ring device | $0 |
| Ring Bridge | Ring Bridge (sold separately) | $49.99 |
| Ring Alarm Pro Base Station | Ring Alarm Pro kit | Included in kit |
Amazon Sidewalk is a shared low-power wireless network that runs on compatible Echo and Ring devices in your area. If you already have an Echo or any Ring device at home, there’s a good chance Sidewalk coverage already reaches your mailbox.
That’s how I connected mine, I had an Echo in my kitchen and the sensor picked it up without any extra hardware. Before assuming you need a bridge, check Amazon’s Sidewalk coverage tool for your address.
New Model vs. Old Model: A Difference Worth Knowing
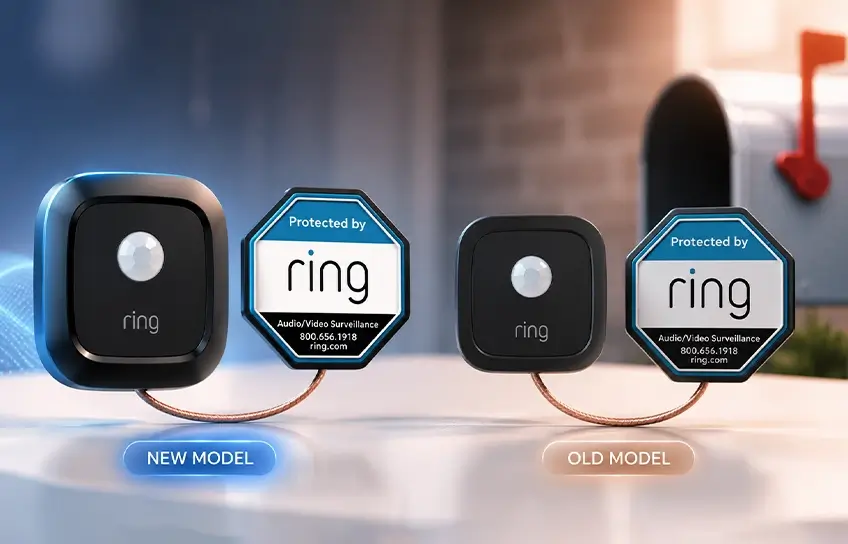
This is something I wish someone had told me before I started researching. There are two Ring Mailbox Sensor versions sitting side by side on Amazon and at hardware stores right now, and they are not the same product.
| Feature | Old Model (B08FBLXDND) | New Model (B0D61BH2RB) |
| Battery Life (claimed) | About 1 year | Up to 3 years |
| Real-World Battery Life | 2 to 3 months on generic AAA | Too new for long-term data |
| Amazon Sidewalk | Added later via update | Built in from day one |
| Bridge Required at Launch | Yes | No |
| Price (sensor only) | $29.99 | $29.99 |
| Colors | Black, White | Black, White |
The old model’s real-world battery life was a common complaint. Users running it on cheap generic AAA batteries reported replacements every two to three months. Ring rated it for a year, but that assumed name-brand batteries and low mailbox activity. If your carrier comes six days a week and you’re using whatever batteries came in a bulk pack, don’t expect a year.
The new model is a genuine hardware revision. Whether the 3-year claim holds up in daily use is something only time will tell, but the engineering behind it is different enough that I’d only buy the new one. Make sure you’re looking at model number B0D61BH2RB when you order. Both versions cost the same.
Setting It Up
I set up the app side of things before touching the mailbox, which the in-app instructions actually recommend. Smart move, because it lets you confirm the sensor is working before you’ve already stuck it inside a metal box with adhesive.
Download the Ring app, tap the plus icon, select “Set Up a Device,” and choose Mailbox Sensor from the list. The app asks what type of mailbox you have, metal or plastic, and walks you through the connection steps. If you’re connecting through Sidewalk, it finds your compatible device automatically.
If you’re setting up a Ring Bridge for the first time, you’ll need to plug it in, wait for the blue light to flash, and scan the QR code on the bridge before you can add the sensor. That QR code step is where a few people run into trouble: the app asks you to scan a code but isn’t clear about which device’s code to scan first. Scan the bridge first, not the sensor.
Once the bridge was set up and the sensor was paired, I gave the sensor a name, and it immediately appeared in my Ring device list and in my Alexa app. That part took less than five minutes.
Installation: The Part That Takes Patience
Here’s where I’ll be straight with you. If you have a metal mailbox, which most people do, installation takes longer than you’d expect and involves drilling a hole. Not a big hole, but a hole.
The sensor sits inside the mailbox. The antenna needs to sit outside so it can communicate with your bridge or Sidewalk network. Metal blocks the signal, so you need to route the antenna cable from the inside to the outside through a small hole in the mailbox wall. Ring includes the drill bit for this exact reason.
For a standard metal mailbox:
- Set up the sensor in the Ring app before touching the mailbox.
- Drill a small hole in the back or side wall of your mailbox using the included drill bit.
- Thread the antenna cable through the hole before attaching the sensor to anything.
- Mount the sensor to the inside of the mailbox door using the adhesive pad, position it close to the hinge side, not the far wall.
- Attach the external antenna to the outside of the mailbox, using the adhesive or the mounting hardware.
- Open and close the mailbox door a few times to make sure the antenna cable doesn’t snag on anything.
- Check your phone, you should see an alert within a second or two of the door opening.
The antenna cable snagging is something I didn’t think about until it happened. The first time I tested it, the cable caught on the edge of the door and I got three false alerts in a row from the antenna tugging on the sensor. Routing the cable flat against the mailbox wall and securing it with the included wire clips fixed it immediately.
For a plastic mailbox:
Skip the drilling entirely. The signal passes through plastic well enough that you can route the cable through any existing gap, under the door seal, through a mail slot edge, anywhere there’s a small opening. I’ve seen people with plastic mailboxes skip the external antenna altogether and report no signal issues, though your results will depend on how far your mailbox sits from the bridge.
If you have a locking mailbox:
This one gets a little creative. The sensor won’t trigger from a narrow mail slot opening, it needs to detect the motion from a full door swing. If your locking mailbox has a main door and a separate mail slot, mount the sensor inside the main compartment near the door hinge and set the sensitivity to its highest level in the app.
Day-to-Day Performance

After a few weeks of use, this is what I can actually tell you from experience.
Alerts arrive fast. Every time my mail carrier opened the box, my phone buzzed within about two seconds. I tested this while watching from a window. The timing was consistent, not occasionally fast, fast every single time under normal conditions.
The motion sensitivity setting in the app matters more than I expected. Out of the box, I had it set to medium. On a windy afternoon, a lightweight plastic insert inside my mailbox shifted and triggered two false alerts. I bumped the sensitivity down one notch and haven’t had a false trigger since.
Range held up fine for my setup. My mailbox is about 60 feet from the front of my house with no major obstructions. The Sidewalk connection was rock solid throughout testing. If your mailbox is further out, say, 150 to 200 feet, several users report reliable performance at that range, though signal consistency can drop beyond 200 feet especially if there are trees or walls in the way.
The app experience has one quirk worth knowing. The Ring Mailbox Sensor shows up under the “Lights” section in the Ring app because it shares a platform with Ring’s smart lighting products. It has nothing to do with lights, but that’s where you’ll find it. Took me a minute to locate it the first time. Once you know where to look, it’s fine.
Connecting It to Other Ring Devices
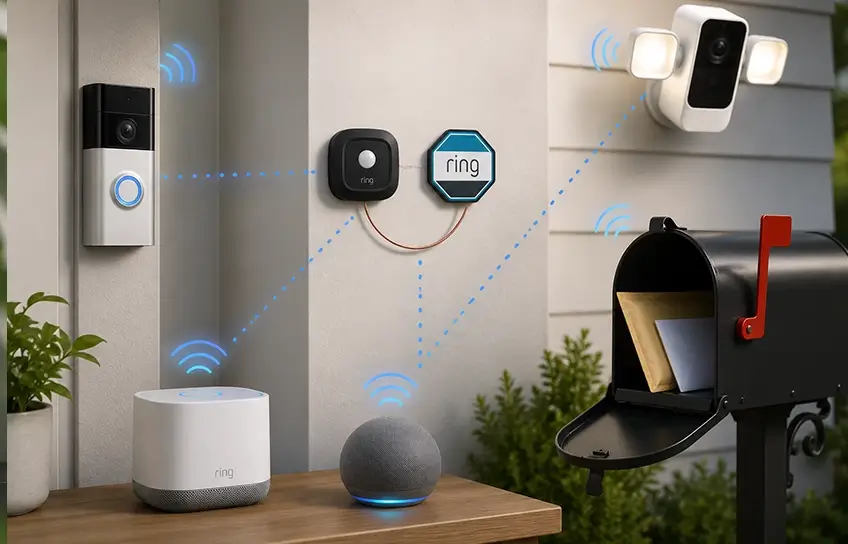
This is where the sensor earns its keep beyond just sending you a notification.
I linked it to my Ring Doorbell Camera through the Linked Devices feature in the Ring app. Now, every time the mailbox opens, the doorbell camera starts recording automatically. That combination, a motion alert from the mailbox sensor and a recorded clip from the camera, gives you a complete picture of who’s been at your mailbox even when you weren’t watching.
If you also have a Ring Alarm Security Kit installed, the mailbox sensor adds a perimeter monitoring layer that works independently from your indoor alarm system. It won’t trigger your alarm when the mail comes, but it keeps a log and sends you a notification every single time.
For people who already have a Ring Spotlight Cam Pro in the yard, linking that to the mailbox sensor turns on the spotlight and starts recording the moment the mailbox opens. That’s useful at night and genuinely discourages anyone thinking about helping themselves to your packages.
I also set up an Alexa routine through the Alexa app. Every time the mailbox opens, my Echo says “You’ve got mail.” It’s a small thing, but it actually works better than a phone notification when I’m moving around the house and my phone is in another room.
Does It Require a Subscription?
No. This question comes up constantly and deserves a direct answer.
You do not need to pay for Ring Protect to receive alerts when your mailbox opens. The free tier covers everything you actually need for day-to-day use:
- Push notifications to your phone through the Ring app
- Alexa voice announcements on any linked Echo device
- Triggers for Ring Smart Lighting and linked cameras
- Motion event history log in the app
Ring Protect (starting at $4.99 per month per device, or $10 per month for all your Ring devices) only becomes relevant if you want the video clips from a linked camera saved to the cloud. The mailbox sensor itself doesn’t record video and doesn’t store anything. If you just want to know when the mail arrives, the free plan is genuinely sufficient.
The Real Downsides
I’d rather tell you the actual problems than pad this section with vague cautions.
The size is real. The sensor is bigger than you’d imagine for something going inside a mailbox. On a day when I had a large bubble mailer and a few packages waiting, the sensor got knocked loose from the adhesive. I re-stuck it with stronger outdoor mounting tape and it’s been fine since, but the stock adhesive pad isn’t something I’d bet on long-term in a busy mailbox.
No Google Assistant or Apple HomeKit support. If your smart home runs on Google Home or Apple’s ecosystem, this sensor won’t talk to it. It’s Amazon Alexa only for voice integrations. That’s a real limitation for a chunk of buyers.
Sidewalk coverage isn’t everywhere. Amazon Sidewalk works great in most suburban neighborhoods, but if you’re rural or in an area with few Amazon devices nearby, coverage may be spotty or nonexistent. In that case you’ll need the Ring Bridge, which adds $49.99 to the cost and changes the value calculation.
You will get an alert when you put outgoing mail in the box. The sensor has no way to distinguish between your mail carrier delivering and you walking out to drop off a letter. It alerts on all motion. Most people adapt to this quickly, but it’s worth knowing.
Who Should (and Shouldn’t) Buy It
It’s a strong buy if you:
- Already own any Ring or Amazon Echo device at home
- Have a mailbox that’s far enough from your door that checking it is an actual errand
- Want to link it to a Ring camera or doorbell for automatic recordings when mail arrives
- Have had mail stolen or go long stretches without checking the box
It’s probably not the right fit if you:
- Have a very small or compact mailbox where the sensor won’t comfortably fit
- Are fully invested in Google Home or Apple HomeKit and have no Amazon devices
- Live far enough out that Sidewalk won’t reach and you don’t want the extra bridge cost
- Want video footage of your mailbox, not just a motion alert (a camera covers that better)
My Verdict
At $29.99, the Ring Mailbox Sensor does exactly what it claims. Alerts are fast, the Sidewalk connection means most people don’t need extra hardware, and the new model’s battery life makes it a genuinely low-maintenance addition to a mailbox.
The app placement under “Lights” is still annoying. The size can be awkward in smaller mailboxes. And if you’re not in the Amazon ecosystem at all, this sensor doesn’t fit neatly into your setup.
But for anyone already running Ring cameras, an Echo device, or a Ring doorbell, this is probably the cheapest smart home upgrade that changes something you do every single day. I stopped making pointless trips to an empty mailbox. That alone made it worth the $29 to me.
If you want to expand beyond mail alerts and build out full driveway coverage, pairing this with a Ring Spotlight Cam Pro or a Ring Indoor Cam Plus turns your front yard into a properly monitored zone without spending a lot of money.